JNTZN

Tag: workflow

  • How to Compare Productivity Tools and Choose the Right Stack

    How to Compare Productivity Tools and Choose the Right Stack

    The average knowledge worker does not have a time problem. The real problem is a tool problem. Too many apps promise focus, speed, and control, yet the wrong stack creates duplicated work, fractured context, and constant switching between tabs.

    A knowledge worker at a desk surrounded by many floating app windows and browser tabs (task manager, notes, chat, calendar), with arrows showing duplicated entries and a tangled line labeled “context loss” to convey fractured context and constant switching between tabs.

    That is why teams and individuals increasingly need to compare productivity tools before adopting them. A task manager that works beautifully for a solo developer may fail inside a cross-functional team. A note-taking app may excel at capturing ideas but collapse when documentation, automation, and collaboration become requirements. The goal is not to find the “best” productivity tool in the abstract. The goal is to identify the right fit for a specific workflow, technical environment, and operating style.

    For developers and efficiency-focused professionals, this comparison process should be systematic. Features matter, but so do latency, integrations, data portability, permission models, search quality, and cognitive overhead. A tool that looks powerful on a pricing page can become expensive if it adds friction to everyday work. A simpler tool can outperform a feature-rich platform if it reduces decision fatigue and keeps execution moving.

    What Is Compare Productivity Tools?

    To compare productivity tools means evaluating software platforms that help users plan, track, create, communicate, automate, and organize work. This includes categories such as task managers, project management platforms, note systems, calendar tools, team collaboration suites, and knowledge bases. The comparison is not only about feature parity. It is about understanding how each product behaves under real conditions.

    In practical terms, productivity tool comparison is a framework for answering a set of operational questions. Can the platform handle both personal planning and shared execution? Does it support structured workflows or only lightweight to-do lists? Is information easy to retrieve after three months, or does it disappear into clutter? These questions matter more than a polished landing page.

    For developers, the comparison often extends beyond user interface and pricing. It includes API availability, webhook support, Markdown compatibility, Git or repository integrations, and automation paths through services like Zapier, Make, or native rules engines. A general user may care most about ease of use. A technical user often cares about whether the tool can become part of a larger system.

    Why Comparison Matters More Than Feature Hunting

    Many buyers evaluate software by scanning a checklist. That approach is fast, but it is incomplete. Two tools may both advertise reminders, dashboards, templates, and AI assistance, yet one will still produce a cleaner working day than the other.

    The reason is workflow fit. Productivity software sits at the center of daily habits. If the structure of the tool conflicts with the structure of the work, users compensate manually. They create naming conventions, workaround databases, duplicate notes, and disconnected calendars. That hidden maintenance cost is rarely visible in product demos.

    A careful comparison helps prevent this. It reveals trade-offs early, before the team migrates data, trains users, and builds dependencies on a platform that may not scale with real usage.

    Categories Commonly Included in Productivity Tool Comparisons

    When people compare productivity tools, they are usually comparing one or more of these categories:

    Category Primary Purpose Typical Strength Common Limitation
    Task Management Track personal or team work items Clear action tracking Can become shallow for documentation
    Project Management Coordinate multi-step work across teams Visibility and dependencies Often heavier to maintain
    Note-Taking Capture ideas, reference material, and knowledge Fast information capture Weak execution tracking
    Knowledge Management Store and organize durable information Searchable team memory Requires governance
    Calendar and Scheduling Manage time allocation and availability Time-based planning Limited task depth
    Collaboration Platforms Centralize messaging and shared work Fast communication Information can become fragmented

    This distinction matters because many tools now overlap. A note app may add task tracking. A task manager may add docs. A project platform may add chat and AI summaries. The overlap creates convenience, but it also makes comparison harder. Buyers must decide whether they want an all-in-one workspace or a modular stack.

    Key Aspects of Compare Productivity Tools

    A strong comparison model starts with structure. Without criteria, most evaluations collapse into vague impressions such as “this one feels cleaner” or “that one has more features.” Those observations are valid, but they should not drive the entire decision.

    The better approach is to assess productivity tools across several operational dimensions, then match those findings against the actual work being done. That is how a solo freelancer, a startup engineering team, and an enterprise operations group can arrive at different, equally correct decisions.

    Usability and Cognitive Load

    The first and most immediate factor is usability. This is not limited to visual design. It includes how quickly a new user can create structure, navigate views, find information, and return to interrupted work without reorienting.

    A clean interface is useful, but the deeper issue is cognitive load. Some tools expose every possible property, relation, and automation rule up front. That can be excellent for power users and exhausting for everyone else. Other tools deliberately constrain customization, which improves adoption but may limit long-term flexibility.

    For developers, this trade-off is familiar. A highly configurable platform behaves like a framework. A simple app behaves like a focused utility. Neither is inherently better. The right choice depends on whether the workflow needs strict modeling or fast execution.

    Feature Depth Versus Workflow Friction

    A common mistake in productivity software selection is equating more features with more productivity. In practice, feature depth only matters if it reduces friction. If users need five clicks to capture a task, assign a date, and link supporting notes, the tool is consuming attention instead of preserving it.

    The strongest platforms tend to do two things well. First, they support a low-friction default workflow. Second, they allow complexity to emerge only when needed. This pattern is visible in products that work well for both personal planning and collaborative operations.

    Feature depth should also be evaluated in context. A team managing releases, bug triage, content calendars, and internal docs may benefit from a unified system. A solo developer tracking coding goals and reading notes may be more productive with a lightweight combination of notes, tasks, and calendar blocking.

    Collaboration and Permission Models

    Many productivity tools look excellent in single-user mode and become far less effective once multiple stakeholders join. Collaboration introduces permission boundaries, ownership ambiguity, version control issues, and noise. A useful comparison must therefore include multi-user behavior.

    This means examining commenting systems, mentions, shared views, access controls, guest permissions, approval flows, and audit history. It also means asking whether the tool supports asynchronous work well. Fast-moving teams need software that preserves context even when contributors are in different time zones or departments.

    A platform like Home becomes relevant here when the problem is not just storing work, but coordinating it in a way that remains visible and manageable across users. The benefit is not the brand itself. The benefit is having a central environment where tasks, information, and progress can stay connected instead of being scattered across disconnected apps.

    Integrations, APIs, and Automation

    For technically minded users, integrations are often the dividing line between a tool that is helpful and a tool that becomes infrastructure. Native integrations reduce manual copying. APIs and webhooks allow custom flows. Automation rules reduce repetitive coordination work.

    This matters because productivity breaks down fastest at transition points. A task created from a support ticket, a note linked to a pull request, or a meeting outcome pushed into a sprint board saves more than time. It preserves continuity. The user no longer needs to remember where information originated.

    When comparing tools, examine whether integrations are native, partial, or dependent on third-party middleware. Also assess the maturity of the API, documentation quality, rate limits, event reliability, and export options. A polished integration page is not enough. Technical users should treat integration claims the way they would treat performance claims in software engineering, as something to validate, not assume.

    Search, Organization, and Retrieval Quality

    A productivity tool is not just a place to put information. It is a system for retrieving the right information at the right moment. Search quality is therefore a core evaluation criterion, particularly for note apps, knowledge hubs, and project documentation tools.

    Weak search creates a hidden tax. Users recreate notes they cannot find, ask questions already answered, and open multiple views to reconstruct missing context. Over time, this erodes trust in the system. Once trust falls, adoption follows.

    Good retrieval combines several elements: full-text indexing, structured filters, consistent tagging or metadata, linked references, and fast performance. The practical question is simple. Can a user recover a decision, task, or document quickly under pressure? If not, the tool is not improving productivity, regardless of how attractive the workspace appears.

    Pricing, Scalability, and Total Cost

    Sticker price is only one layer of cost. When users compare productivity tools, they should also evaluate training time, migration effort, admin overhead, and the cost of fragmented workflows. A lower-cost app that requires three supporting tools may be more expensive than an integrated platform with a higher subscription fee.

    Scalability matters as well. Some tools are excellent at one level of complexity and unstable at the next. A note app may become cluttered when used as a company wiki. A task tool may struggle once custom fields, reporting, and dependencies become mandatory. A project platform may feel excessive for a team of two.

    The comparison should therefore include present needs and near-term growth. Good software selection does not optimize only for today. It avoids locking the user into a model that breaks once the workload, team size, or process maturity increases.

    How to Get Started with Compare Productivity Tools

    A productive evaluation process starts by defining work, not software. Most failed tool decisions happen because users begin with product categories and pricing plans instead of actual operating requirements. The question is not “Which app is popular?” The question is “What kind of work must this system support every day without friction?”

    A simple flowchart or roadmap showing the evaluation process: Map workflow → Define primary use case → Build evaluation matrix → Pilot with real work → Measure friction → Choose fit. Use distinct boxes and arrows to show sequence and decision points.

    Start by mapping the workflow in plain terms. Identify where tasks originate, where documentation lives, how deadlines are managed, how collaboration happens, and where work currently gets stuck. This baseline makes comparison objective. It also prevents feature hype from distorting priorities.

    Define the Primary Use Case First

    One tool rarely solves every problem equally well. That is why the first step is identifying the dominant use case. Is the priority personal task execution, team project coordination, deep note-taking, meeting management, or cross-functional visibility? The answer changes the evaluation completely.

    If the primary use case is personal execution, speed and simplicity may outweigh reporting and permissions. If the primary use case is team delivery, shared views, dependencies, and status visibility matter more. If the use case is technical knowledge management, search, linking, Markdown support, and version-friendly export become critical.

    Without that clarity, comparisons become distorted. A project platform can appear weak compared to a notes app if the evaluator values capture speed above all else. The opposite is also true.

    Build a Small Evaluation Matrix

    A compact evaluation matrix is usually more useful than a long checklist. Limit criteria to the capabilities that directly affect output quality, coordination speed, and maintenance burden. This keeps the process grounded.

    A practical matrix might look like this:

    Evaluation Criterion Why It Matters What to Test
    Ease of Capture Determines whether users record work consistently Create tasks, notes, and follow-ups in under a minute
    Organization Model Shapes long-term clarity Test projects, tags, folders, databases, or linked pages
    Collaboration Affects team adoption Add comments, assign items, manage permissions
    Integrations Reduces manual handoff work Connect calendar, chat, repository, or email workflows
    Search and Retrieval Protects information value over time Find old notes, tasks, and decisions quickly
    Automation Reduces repetitive admin Trigger reminders, status changes, or recurring workflows
    Scalability Prevents future replatforming Simulate a larger workload or more contributors

    This kind of matrix allows direct side-by-side review without becoming an abstract scorecard detached from real use.

    Test with Real Work, Not Demo Data

    The fastest way to misjudge a productivity platform is to test it with empty sample projects and generic template content. Most tools look good in a vacuum. The weaknesses appear when live work enters the system.

    Use a one- or two-week pilot with actual tasks, meetings, notes, decisions, and deadlines. Import a realistic volume of information. Assign items across collaborators. Attempt retrieval after several days. Observe what the tool encourages by default. Some systems naturally create order. Others require constant intervention.

    For developers, include technical scenarios in the pilot. Link documentation to tickets, connect planning notes to repositories, or move issue summaries into a project board. That exposes how well the tool handles structured, high-context work rather than only superficial planning.

    Measure Friction Points Explicitly

    A useful comparison should capture not just what a tool can do, but where it slows users down. Friction often appears in subtle forms. Too many fields during task creation. Weak keyboard navigation. Poor mobile capture. Slow synchronization. Confusing permissions. Rigid views that force users into one planning style.

    Document these points during testing. The comparison becomes much sharper when evaluators can say, with evidence, that one tool required fewer steps for recurring actions or produced fewer retrieval failures during the pilot period.

    This is also where integrated environments can outperform fragmented stacks. If a platform such as Home reduces app switching by keeping planning, collaboration, and reference material close together, that benefit may outweigh a few missing advanced features. Reduced context switching is often more valuable than theoretical capability.

    Decide Between All-in-One and Best-of-Breed

    One of the central decisions in any effort to compare productivity tools is architecture. Should the user adopt one platform that handles many functions, or a specialized stack where each tool does one job well?

    An all-in-one system typically improves visibility, reduces duplication, and lowers context switching. It can also simplify onboarding and administration. The trade-off is that one or more modules may feel less refined than category-leading standalone products.

    A best-of-breed stack offers stronger specialization. The note tool is optimized for knowledge, the task app for execution, the calendar for scheduling, and the chat platform for communication. The downside is integration complexity. Information can fragment unless the user is disciplined and the connectors are reliable.

    This choice is less about ideology and more about operating reality. Teams with mature processes and technical integration skills may benefit from modular stacks. Individuals and smaller teams often gain more from coherence than specialization.

    A Simple Starting Procedure

    For readers who want a direct path, this sequence is usually enough:

    1. Define the primary workflow that needs support.
    2. Select three tools that align with that workflow category.
    3. Test each tool using real tasks, notes, and collaboration scenarios.
    4. Compare friction, retrieval speed, and integration quality.
    5. Choose the tool that improves consistency, not just capability.

    This process is deliberately short. Complex evaluation methods often fail because they consume more time than the problem they are meant to solve.

    Conclusion

    To compare productivity tools effectively, the focus should stay on operational fit. The best choice is not the platform with the longest feature list or the loudest marketing. It is the one that supports real work with the least friction, the clearest structure, and the strongest long-term reliability.

    For developers and efficiency-minded professionals, this means evaluating usability, collaboration, automation, search, scalability, and total workflow cost as a connected system. A strong tool should not only store tasks and information. It should reduce context switching, preserve clarity, and make execution easier day after day.

    The next step is practical. Pick a narrow use case, shortlist a few candidates, and run a real pilot. Compare what happens in actual work, not what appears in product copy. That is where the right answer becomes obvious.


  • Productivity Tool Setup Guide — Reduce Tool Friction

    Productivity Tool Setup Guide — Reduce Tool Friction

    Most people do not have a time problem, they have a tool friction problem. Work gets slower not because tasks are unusually difficult, but because notes live in one app, tasks in another, files in a third, and alerts arrive from everywhere at once. A productivity stack that is installed but not configured properly quickly turns into another source of noise.

    A visual of 'tool friction': multiple app windows/icons (notes app, task manager, calendar, chat, file storage) scattered around a person at a desk. Arrows between apps cross and tangle, and small visual 'noise' symbols (bells, red dots) indicate notifications. Emphasize friction and fragmentation rather than complexity.

    A solid productivity tool setup guide fixes that at the system level. Instead of chasing isolated tips, it defines how tools should capture inputs, organize work, surface priorities, and reduce context switching. For developers and efficiency-minded professionals, that matters more than any single app recommendation. The best setup is not the one with the most features. It is the one that disappears into the background and reliably supports execution.

    What is a productivity tool setup guide?

    A productivity tool setup guide is a structured method for selecting, configuring, and connecting the tools used to manage work. It covers the practical design of a personal or team workflow, including task management, note capture, calendar control, communication boundaries, automation, and file organization. The purpose is not simply to install software, the purpose is to create a repeatable operating environment.

    In technical terms, a good setup guide functions like system architecture for attention. Inputs are routed into known channels. Processing rules determine what becomes a task, what becomes a note, and what gets ignored. Outputs, such as scheduled work, documented decisions, and completed deliverables, become easier to track because the system has consistent states and fewer exceptions.

    A system-architecture diagram for attention: inputs (email, chat, meeting notes, PRs) flow into three labeled funnels/channels (Capture, Process/Organize, Execute) with processing rules boxes that route items into Task System, Knowledge Base, or Archive. Outputs (scheduled work, documented decisions, completed deliverables) come out the other side. Use clear labels for channels and routing decisions.

    For developers, this matters in a very specific way. Engineering work often combines deep focus, asynchronous communication, ticket-driven execution, documentation, and ad hoc troubleshooting. If the setup does not distinguish between high-focus work and low-value interruptions, the day gets fragmented. A proper configuration reduces the number of decisions required just to begin working.

    The guide also serves another purpose, which is long-term maintainability. Many people build a workflow accidentally, one app at a time. Over months, the stack becomes bloated. Notifications multiply. Duplicate systems emerge. A setup guide imposes constraints. It clarifies what each tool is for, what it is not for, and how information should move across the stack.

    Key aspects of a productivity tool setup guide

    Define the role of each tool

    The first rule in any effective productivity system is simple, one clear role per tool. Confusion starts when the same type of information is stored in multiple places. Tasks in chat, ideas in email drafts, project notes in local text files, and deadlines in memory create an unreliable operating model.

    A better approach is to assign strict functional boundaries. One tool should serve as the task system of record. Another should serve as the knowledge base. A calendar should represent hard commitments, not wishful intentions. Communication tools should be used for discussion, not long-term storage. When each system has a defined role, retrieval becomes predictable and trust increases.

    This separation is especially important for developers who already work across issue trackers, code repositories, terminal environments, and team chat. Without boundaries, the same bug might appear in GitHub Issues, Slack, a notebook, and a calendar reminder. The duplication feels safe at first, but it creates synchronization overhead. A good setup removes that redundancy.

    Build around capture, organization, and review

    Every strong setup handles three phases well, capture, organization, and review. Capture refers to the ability to record incoming ideas, requests, and obligations quickly. If capture is slow, people defer it. Deferred capture becomes forgotten work.

    Organization is the process of converting raw input into structured information. That means deciding whether an item is actionable, reference material, waiting on someone else, or irrelevant. The key is to avoid over-organizing. Too many folders, tags, and statuses create more maintenance work than value.

    Weekly review is the part most users skip, and it is the reason many systems fail after a few weeks. A setup only stays useful if it is checked regularly. Daily review keeps priorities current. Weekly review resets project status, removes stale items, and catches drift before it becomes disorder. In practice, review is what converts a collection of apps into an actual system.

    Minimize context switching

    A major objective of any productivity tool setup guide is reducing attention fragmentation. Context switching is expensive. It introduces latency, increases mental reload time, and lowers the quality of deep work. This is not just a preference issue, it is a throughput issue.

    The setup should therefore reduce unnecessary app hopping. Notifications must be tuned aggressively. Integrations should support flow, not add noise. If a tool can centralize alerts, summaries, or task updates without becoming another inbox, it usually improves focus. This is one reason unified environments can work well when configured carefully. A platform like Home, for example, can be useful when the goal is to reduce scattered touchpoints and create a cleaner work surface rather than adding yet another destination.

    The practical test is simple. At any point in the workday, it should be obvious where new inputs arrive, where current priorities live, and where supporting information is stored. If that answer changes depending on the day, the setup needs simplification.

    Design for retrieval, not just storage

    Many people optimize for collecting information. Fewer optimize for finding it later. That is a critical mistake. A productivity system is only as effective as its retrieval path. Notes that cannot be found, tasks buried under vague labels, and files named inconsistently all increase friction at the point of execution.

    A better design uses a small number of categories, predictable naming, and lightweight metadata. Projects should have stable names. Meeting notes should follow the same title pattern. Files should be stored according to how they are retrieved in practice, not according to an ideal taxonomy no one remembers.

    This principle applies strongly to technical workers. Documentation is useful only if it is discoverable during implementation, debugging, onboarding, or handoff. A clean setup treats future retrieval as a primary requirement, not an afterthought.

    Match the stack to work type

    Not every workflow needs the same tools. A solo developer, a startup operator, and an enterprise engineering manager all have different needs. The right setup depends on the volume of communication, complexity of projects, collaboration model, and reporting requirements.

    A lightweight stack may be enough for an individual contributor. That often means one task manager, one notes repository, a calendar, and basic automation. A more complex environment may need issue tracking, team documentation, scheduled reporting, collaboration spaces, and dashboarding. The mistake is assuming that more complexity equals more control. In many cases, extra layers only make the system harder to maintain.

    The most reliable setups are usually conservative. They cover the critical functions well and avoid optional complexity until there is a real operational need.

    Core tool categories and their purpose

    Tool Category Primary Function Configuration Priority Common Failure Mode
    Task Manager Track actionable work and next steps High Treated as a wishlist instead of a current execution system
    Notes/Knowledge Base Store reference material, decisions, and ideas High Over-tagging and poor retrieval structure
    Calendar Manage time-bound commitments High Used for vague intentions rather than real constraints
    Communication Tool Support discussion and coordination Medium Becomes a task manager and archive at the same time
    File Storage Preserve assets and documents Medium Inconsistent naming and duplicated versions
    Automation Layer Move information between systems Medium Automates broken processes instead of fixing them
    Dashboard/Home Workspace Centralize visibility and reduce switching Medium to High Added as another destination without clear workflow value

    How to get started with a productivity tool setup guide

    Start with workflow mapping, not app shopping

    The best way to begin is to map the work before choosing or reconfiguring tools. Many people start with feature lists and pricing pages. That usually leads to a stack that looks impressive but does not fit actual behavior. Workflow mapping reveals the real requirements.

    Track where work enters the system, how it gets clarified, where it is executed, and how it is reviewed. For a developer, this often includes issue trackers, pull request reviews, standups, chat messages, meeting notes, and personal tasks. Once those flows are visible, tool choices become more obvious. The setup should reflect actual demand patterns, not aspirational productivity habits.

    This stage also reveals duplication. If the same item is captured in three places, one of those locations should be eliminated. If approvals are hidden in chat but project status lives elsewhere, the handoff point needs to be made explicit. Good setup is often subtraction before addition.

    Establish a minimum viable stack

    A practical productivity system usually begins with a short list of components: a task manager, a notes or documentation tool, a calendar, a primary communication channel, and an optional dashboard or workspace hub. That minimal stack is enough for most individuals and many small teams. The important part is not the quantity of tools but the contract between them. The task manager owns action items. The notes tool owns reference material. The calendar owns fixed time commitments. Communication tools handle conversation and escalation, not long-term planning.

    If a central workspace is added, it should reduce search time and provide visibility across priorities. That is where a solution like Home can add value, especially for users who want a simpler control layer over fragmented apps and recurring work surfaces.

    Configure capture paths first

    Before customizing tags, themes, templates, or advanced views, configure capture. This is the highest-leverage step. If incoming information does not enter the system quickly, nothing else matters.

    Create one default path for tasks and one for notes. The task path should be fast enough to use during meetings, coding sessions, and interruptions. The note path should support quick idea capture without forcing premature categorization. Email forwarding, mobile widgets, browser shortcuts, and keyboard quick-add features are often more valuable than advanced organization settings.

    The reason is behavioral. People consistently use systems that have low entry friction. They abandon systems that require too many decisions at the moment of capture. Good setup respects that constraint.

    Keep organization deliberately simple

    A common failure pattern is building a beautifully structured system that is too complex to sustain. Excessive tags, nested folders, multi-stage statuses, and custom taxonomies may look efficient, but they usually increase maintenance cost. A productivity system should support work, not become work.

    Use a limited number of project areas and statuses. Choose naming conventions that are obvious on first glance. Prefer broad categories over fine-grained classification unless reporting requirements justify the detail. If a label is rarely used for retrieval, it probably does not need to exist.

    This principle is even more important when the system is shared with others. Complexity compounds under collaboration. What feels precise to one user often feels ambiguous to the rest of the team.

    Set review intervals and protection rules

    A setup becomes reliable when it has operational cadence. That means the system is not only configured once but maintained through routine review. Daily review keeps the current task list aligned with reality. Weekly review checks open loops, stale projects, deferred items, and upcoming deadlines.

    Protection rules are equally important. These are the boundaries that prevent degradation. For example, tasks should not live permanently in chat. Calendar blocks should correspond to genuine commitments. Notes should be linked to projects when relevant. Notifications should be opt-in for low-priority channels and explicit for urgent ones.

    A system without review becomes a graveyard. A system without rules becomes inconsistent. A durable setup requires both.

    Implement in a controlled sequence

    The rollout should be sequential, not simultaneous. Rebuilding everything at once creates unnecessary resistance and makes it difficult to diagnose what is working.

    1. Audit current tools and remove obvious duplicates.
    2. Choose the system of record for tasks and notes.
    3. Configure capture methods and notification rules.
    4. Define naming conventions, project structure, and review cadence.
    5. Add integrations or a central workspace only after the core flow is stable.

    This sequence works because it preserves functional clarity. Capture and execution come first. Optimization comes later. Once the core system is stable, dashboards, automations, and unified workspaces can be layered in with less risk.

    Example of a practical developer setup

    A developer-focused configuration often works best when it mirrors the rhythm of technical work. Tickets and deliverables should live in the primary task system or issue tracker. Meeting outcomes and architecture notes should live in the documentation layer. The calendar should contain actual time-bound events, along with selective focus blocks for deep work. Chat should remain for coordination, not long-term task storage.

    In this configuration, the daily operating loop becomes straightforward. New requests are captured quickly. Work is clarified into next actions. Supporting context is stored in notes or project documentation. Scheduled obligations are visible on the calendar. Review closes the loop. If a workspace such as Home is used on top of that stack, its role should be visibility and simplification, giving the user one dependable place to see priorities, context, and current commitments.

    The result is not a perfect system. No real productivity setup is perfect. The result is a lower-friction environment that supports consistent execution.

    Conclusion

    A strong productivity tool setup guide is less about software selection and more about system design. It defines the role of each tool, reduces duplication, improves capture, simplifies organization, and creates a review rhythm that keeps the whole structure usable over time. For developers and efficiency-focused professionals, that translates directly into better focus, cleaner handoffs, and less operational drag.

    The next step is to audit the current stack with a strict lens. Identify where tasks actually live, where context gets lost, and where switching costs are highest. Then simplify. Configure one reliable capture path, one trusted task system, one clear notes repository, and a review cadence you can sustain. Once that foundation is stable, tools like Home can help unify visibility and make the setup even more efficient without adding unnecessary complexity.

  • Time Management Tools: Protect Focus and Boost Output

    Time Management Tools: Protect Focus and Boost Output

    Time disappears fastest when work is fragmented. A few messages, a calendar alert, an unfinished task, a context switch, and suddenly a full afternoon has been consumed without meaningful progress. That is exactly why time management tools matter. They do not create more hours, but they make hours more visible, structured, and defensible.

    A visual of a single afternoon being eaten by many small interruptions: floating icons for chat messages, email alerts, a calendar notification, a half-finished task sticky note, and a developer looking distracted while the clock hands spin quickly. The composition should convey that fragmented, small events aggregate into a large loss of focused time.

    For developers and efficiency-focused professionals, the problem is rarely a lack of ambition. It is usually a systems problem. Work arrives from multiple channels, priorities shift in real time, and deep focus competes with meetings, support requests, and administrative overhead. The right toolset turns this chaos into an operable workflow, creating a layer between intention and distraction.

    This article examines what time management tools are, how they function in practice, which categories matter most, and how to adopt them without building a complicated productivity stack that becomes another source of friction. The objective is not to recommend more software for its own sake. It is to show how to use tools to protect attention, reduce task drift, and improve output quality over time.

    What is Time management tools?

    Time management tools are systems, applications, and interfaces designed to help individuals plan, allocate, track, and optimize how time is used. At a basic level, they help answer four operational questions: what needs to be done, when it should be done, how long it should take, and whether time was actually spent as intended.

    In practical terms, the category includes task managers, digital calendars, project planning platforms, focus timers, habit trackers, time trackers, scheduling assistants, and automation tools. Some tools are lightweight, built for personal use and rapid capture. Others are designed for teams, where time management intersects with resource planning, sprint velocity, delivery forecasting, and workload balancing.

    The phrase itself can sound broad because it is broad. A calendar is a time management tool. So is a Kanban board. So is a Pomodoro timer. So is software that logs application usage and reveals that “quick checks” of email consumed ninety minutes. What unifies them is not form factor, but function. Each tool attempts to bring structure, visibility, and control to time use.

    For technical professionals, the category has an additional layer. Time management is not only about scheduling. It is also about cognitive load management. A developer may need long uninterrupted blocks for architecture work, shorter windows for code review, and explicit boundaries around communication channels. In that context, time management tools become less about rigid planning and more about protecting the conditions required for high-quality work.

    Why the concept matters now

    Modern work environments reward responsiveness, but meaningful progress often depends on the opposite. Deep work requires latency. Good problem solving needs uninterrupted sequences of thought. Without deliberate tooling, the default environment pushes toward reactive behavior, where urgency displaces importance.

    That is why many people adopt time management tools after a failure point. Deadlines slip. Task lists become unreliable. Meetings consume planned execution time. Or personal energy becomes inconsistent because every day feels improvised. The tool is then not a luxury, but a control mechanism.

    Used well, these tools create a feedback loop. Planning improves execution. Execution produces tracking data. Tracking data reveals misestimation, bottlenecks, and distraction patterns. That information then improves future planning. Over time, the user shifts from guessing to managing.

    Key Aspects of Time management tools

    Visibility into commitments

    The first major function of a time management tool is visibility. Many productivity problems are not caused by laziness or poor discipline. They are caused by hidden commitments. Work exists in inboxes, chat threads, issue trackers, personal notes, and memory. If obligations are distributed across too many places, prioritization becomes unreliable.

    A funnel or hub-and-spoke diagram showing multiple sources (email, chat, issue tracker, personal notes, meetings) feeding into a single central dashboard that displays a combined view of tasks, deadlines, and calendar blocks. Emphasize that the central view enables prioritization and reduces hidden commitments.

    A strong tool centralizes what matters. It does not need to hold every artifact, but it should serve as the authoritative layer where tasks, deadlines, and time blocks can be reviewed together. This is where digital calendars and task managers become foundational. One shows when time is already allocated. The other shows what still competes for that time.

    When visibility improves, decision quality improves. It becomes easier to identify overload early, defer low-value work, and avoid the common mistake of assuming open calendar space means available cognitive capacity. Those are not the same thing.

    Prioritization and sequencing

    Not all time management tools are equal in how they handle priority. Some are excellent for capture but weak in sequencing. Others support dependencies, due dates, tags, effort estimates, and status transitions. The right choice depends on whether the user needs simple personal organization or structured workflow control.

    For developers, prioritization often has hidden complexity. A task may look small but require setup time, environment context, or coordination with another team. Good tools support more than deadlines. They help separate urgent, important, blocked, and optional work. They also make sequencing easier by showing what should happen next, not just what exists in the backlog.

    This distinction matters. A long unsorted task list creates anxiety, not execution. Effective time management tools reduce ambiguity by narrowing focus. Instead of presenting fifty open items, they help surface the two or three that deserve the next available block of concentration.

    Time blocking and calendar integration

    One of the most effective applications of time management tools is time blocking, the practice of assigning work to actual periods on the calendar rather than leaving it as abstract intention. This is often where productivity systems become real. A task on a list is a possibility. A task assigned to 10:00 to 11:30 is a commitment.

    Calendar-based planning forces realism. It exposes whether workload actually fits inside available time. It also creates friction against overcommitting. Many professionals discover that their problem is not underperformance, but systematic overplanning. They schedule eight hours of focused work into a day that contains three meetings, multiple interruptions, and unavoidable operational tasks.

    Tools that synchronize tasks and calendar events are particularly useful because they bridge planning and execution. This is also an area where an integrated workspace like Home can be valuable, especially for users who want planning, scheduling, and personal workflow structure in one environment instead of spread across disconnected apps.

    Tracking actual time versus estimated time

    Planning alone is incomplete without measurement. That is why time tracking is one of the most important, and often most misunderstood, categories of time management tools. Tracking is not only for freelancers billing clients or managers monitoring utilization. It is also a diagnostic tool for personal accuracy.

    Many people consistently underestimate how long tasks take. Others fail to account for startup costs, interruptions, and recovery time after context switching. Time tracking reveals these patterns. It helps answer whether recurring work is truly routine, whether meetings generate hidden follow-up overhead, and whether certain parts of the day produce better output than others.

    For technical work, this can be especially useful. Debugging, refactoring, investigation, and performance optimization rarely fit neat estimates. Tracking actual time spent can improve sprint planning, reduce unrealistic commitments, and create more credible future forecasts.

    Focus support and distraction control

    A large segment of time management tools is built around a simple truth, unmanaged attention makes planning irrelevant. A perfect calendar does not help if the planned hour is lost to notifications, tab switching, or passive communication loops.

    Focus tools address this by creating boundaries. Some use timers, such as Pomodoro-based applications. Others block distracting websites, mute notifications, or provide session analytics. The goal is not to gamify concentration, but to reduce the number of times the brain is asked to re-enter a task after interruption.

    This matters because context switching carries a real cost. For developers, that cost can be severe. Rebuilding working memory after interruption takes time and degrades quality. A time management tool that protects uninterrupted sessions may therefore be more valuable than one with a long feature list but no practical support for focus.

    Automation and recurring workflows

    Advanced time management becomes more efficient when routine actions are automated. Repeating reminders, recurring task templates, scheduled reviews, and meeting buffers all reduce the need for manual maintenance. Good tools do not just store plans, they help operationalize them.

    Automation is especially effective for recurring responsibilities that tend to be forgotten because they are small, not because they are unimportant. Weekly planning, code review follow-ups, invoice deadlines, learning sessions, or maintenance tasks benefit from systems that regenerate them automatically. This lowers cognitive overhead and increases consistency.

    The best setups often feel almost invisible. They surface work at the right time, preserve default structures, and reduce decision fatigue. That is a stronger outcome than a feature-rich tool that requires constant upkeep.

    Team coordination versus personal execution

    A common mistake is using one tool to solve two very different problems. Team project platforms optimize for shared visibility, dependencies, assignments, and status reporting. Personal time management tools optimize for focus, scheduling, and day-level execution. Sometimes one product handles both reasonably well. Often, it does not.

    This is why professionals frequently maintain a layered system. Team obligations live in a project management platform. Personal execution happens in a task manager or calendar environment that translates shared commitments into individual time blocks. The separation is useful because project status is not the same as daily actionability.

    A developer may be assigned five tickets in a sprint board, but still need a personal system to decide which one enters the next focus block, how much time to reserve, and when administrative work should happen around it. Time management tools are most effective when that distinction is explicit.

    Comparing common categories of time management tools

    The market is crowded, but most products fall into a small number of operational categories. The comparison below clarifies what each category does best.

    Tool Category Primary Function Best For Limitation
    Task Managers Capture, organize, and prioritize tasks Personal workflows, daily planning, follow-ups Weak if not linked to calendar reality
    Calendars Schedule time-bound events and work blocks Time blocking, meetings, deadline visibility Does not manage backlog complexity well
    Project Management Platforms Coordinate tasks across teams Shared projects, dependencies, progress tracking Can become too heavy for personal execution
    Time Trackers Measure actual time spent Estimation accuracy, billing, productivity analysis Tracking without review creates noise
    Focus Tools Protect attention during work sessions Deep work, distraction control, session discipline Limited value without clear priorities
    Automation Tools Reduce repetitive planning/admin work Recurring tasks, reminders, workflow consistency Poor setup can create silent failure points

    The important point is not to adopt one of everything. It is to identify which operational gaps actually exist. If the problem is forgotten tasks, a timer will not solve it. If the problem is distraction, a better backlog view may not help enough. Tool choice should follow failure mode.

    How to Get Started with Time management tools

    Start with the bottleneck, not the feature list

    Most failed productivity systems begin with enthusiasm and collapse under complexity. The user installs multiple apps, creates tags and categories, imports goals, watches tutorials, and then abandons the setup within two weeks because maintenance becomes a second job.

    A better starting point is to define the bottleneck. Is work being forgotten? Is too much work being accepted? Are priorities unclear? Is focus constantly interrupted? Is task duration consistently underestimated? A good implementation begins with one concrete problem and one corresponding tool capability.

    If someone misses deadlines because tasks are scattered across email and chat, the first need is a trusted capture and task management layer. If someone knows what to do but never finds uninterrupted time, the first need is calendar blocking plus distraction control. This diagnostic approach prevents overbuilding.

    Build a minimal stack

    A minimal stack is usually enough for most professionals. In many cases, a strong combination is one task manager, one calendar, and one method for focused execution. Additional layers should only be added when they solve a known problem.

    A practical starter stack often includes the following elements:

    1. Task Manager for capturing and prioritizing work.
    2. Calendar for assigning time blocks and reviewing commitments.
    3. Focus Method such as timed sessions or notification control.
    4. Optional Tracker for measuring actual time if estimates are unreliable.

    This setup is intentionally restrained. The objective is to create a working system that survives real life, not an idealized dashboard that looks impressive and fails under pressure.

    Define a workflow before customizing

    Tools perform best when attached to a clear workflow. Without one, even excellent software becomes a storage container for good intentions. A simple workflow might look like this: capture all incoming tasks in one place, review and prioritize them daily, assign top tasks to calendar blocks, execute during focus sessions, and review actual progress at the end of the day.

    That sequence matters because it turns productivity from aspiration into process. The software supports the process, but does not replace it. This is where many users go wrong. They expect the application to create discipline automatically. In reality, the tool amplifies whatever workflow already exists, whether disciplined or chaotic.

    For users who want a more unified environment, Home can help reduce fragmentation by bringing daily planning and execution into a single operational space. That matters because fewer system boundaries usually mean less friction and better follow-through.

    Use estimates carefully

    Time estimates are useful, but only when treated as operational signals rather than promises. A developer may estimate a feature task at ninety minutes, then discover that environment setup, dependency issues, and edge case testing expand it to three hours. This does not mean estimation is pointless. It means estimates should be revisited using real tracking data.

    A practical approach is to estimate in broad ranges first. Short, medium, and deep-work tasks are often easier to classify than assigning exact minutes. Once patterns emerge, estimates become more accurate. This helps with both personal planning and team communication.

    The goal is not perfect precision. It is reduced surprise. Better estimates lead to better calendars, fewer missed commitments, and more realistic daily plans.

    Create review loops

    A time management tool becomes valuable only when it is reviewed consistently. Without review, task lists decay, calendars fill reactively, and tracking data remains unused. Review is the maintenance layer that keeps the system credible.

    Daily review should be brief. It checks today’s commitments, identifies the top priorities, and ensures the calendar reflects actual intention. Weekly review is more strategic. It examines overdue work, recurring bottlenecks, unfinished priorities, and upcoming constraints. This is also where the user can decide whether the tool setup still matches current workload.

    These reviews are not administrative overhead in the negative sense. They are control points. They prevent drift. They also convert the tool from passive repository into active management system.

    Avoid common implementation errors

    Several patterns repeatedly undermine adoption. One is using too many tools at once. Another is storing tasks in multiple places without a clear system of record. A third is creating highly detailed plans that collapse the first time the day changes. Overengineering is often just procrastination wearing a technical disguise.

    Another common error is measuring too much without acting on the data. Tracking every minute can feel productive, but if the information is never reviewed, it becomes surveillance rather than insight. The same applies to tags, labels, and project structures that are too granular to sustain.

    The most durable systems are slightly boring. They are predictable, easy to maintain, and clear under stress. That is a feature, not a flaw.

    A practical selection framework

    When evaluating time management tools, it helps to compare them against real operational criteria rather than marketing language.

    Evaluation Factor What to Look For Why It Matters
    Capture Speed Fast task entry on desktop and mobile Friction causes tasks to stay in memory or get lost
    Calendar Integration Two-way sync or easy time blocking Planning improves when tasks meet real time constraints
    Review Usability Clear dashboard, filters, or today view A system that is hard to review will not be maintained
    Focus Support Timers, notification controls, session modes Good planning fails without protected execution time
    Automation Recurring tasks, reminders, templates Reduces repetitive setup and improves consistency
    Scalability Works for both light and busy weeks A tool should not break when workload changes

    This framework is intentionally functional. The right choice is the one that supports execution with the least friction, not the one with the largest feature inventory.

    Conclusion

    Time management tools are most effective when they solve a specific coordination problem between intention, attention, and execution. They help make work visible, translate priorities into time, reveal where hours actually go, and create boundaries around focus. For developers and efficiency-minded professionals, that means fewer lost tasks, better estimates, and more reliable progress on demanding work.

    The next step is simple. Identify the single point where time currently leaks the most, then choose one tool or one integrated environment to address it. Build a small system, review it regularly, and let data refine the process. Better time management is rarely the result of trying harder. More often, it is the result of using the right structure consistently.

  • Convert JPG to PDF Online Free: Fast, Secure & Easy

    Convert JPG to PDF Online Free: Fast, Secure & Easy

    A folder full of JPG files looks manageable until it needs to become one shareable document. That is the point where people start searching for how to convert jpg to pdf online free, usually with urgency. It may be a scanned contract, handwritten notes, product images, receipts, or a set of screenshots that need to be sent in a clean format.

    The appeal is obvious. PDF is portable, predictable, and accepted almost everywhere. JPG is easy to capture, but awkward to organize when multiple images need to be bundled into a single file. A free online JPG to PDF converter closes that gap quickly, often without requiring software installation, account creation, or technical setup.

    For developers, operations teams, students, and everyday users alike, the value is not just convenience, it is workflow compression. A task that once required desktop tools can now be completed in a browser in minutes, sometimes in seconds, with drag-and-drop simplicity and acceptable output quality.

    What is convert jpg to pdf online free?

    The phrase convert jpg to pdf online free refers to using a web-based tool that transforms one or more JPG image files into a PDF document without charging a fee. In practical terms, the user uploads image files, the service processes them on a remote server or in the browser, and then returns a downloadable PDF.

    This solves a common format mismatch. JPG is an image format optimized for photographs and compressed visuals. PDF is a document container designed to preserve layout, improve portability, and simplify sharing across devices and operating systems. When the objective is to send a document rather than a loose set of images, PDF becomes the more functional format.

    There is also an important structural distinction. A JPG file contains a single image object. A PDF can contain multiple pages, embedded images, metadata, and layout instructions. That means several JPGs can be merged into a single ordered document, which is especially useful for forms, invoices, scanned pages, design proofs, and report attachments.

    A side-by-side comparison diagram: left side labeled 'JPG' showing a single raster image thumbnail; right side labeled 'PDF' showing a stack of pages with small image thumbnails on each page plus icons for metadata and layout (e.g., text lines, page numbers).

    Online conversion tools reduce friction because they remove installation and configuration requirements. Instead of opening a desktop editor, exporting files, and manually assembling pages, the process happens in the browser. For users who need speed and minimal setup, this is often the decisive advantage.

    Key Aspects of convert jpg to pdf online free

    Why people convert JPG to PDF in the first place

    The most common reason is document control. A batch of images can feel fragmented. A PDF creates a single, coherent artifact that is easier to upload to portals, email to clients, archive in cloud storage, or attach to support tickets.

    Compatibility is another driver. Many institutions, job portals, finance platforms, and government websites prefer or require PDF uploads. Even if the original content starts as phone photos or exported screenshots, converting those JPGs into PDF is often necessary just to complete the submission.

    There is also a presentation benefit. PDF looks intentional and suggests finality and structure. A set of JPGs may be interpreted as raw source material, while a PDF reads as a finished document. That distinction matters in business communication, internal reviews, and client-facing workflows.

    The main benefits of using an online free converter

    Accessibility is the strongest benefit. A free online JPG to PDF converter can usually be used from Windows, macOS, Linux, Android, and iPhone devices with nothing more than a browser and internet connection. This makes it practical for distributed teams and users working across multiple devices.

    Speed is the next factor. For small to medium conversion jobs, browser-based tools are often faster than installing software. Upload, reorder, convert, download: the interaction model is optimized for quick output.

    Cost matters too. Not every use case justifies a paid PDF suite. If the requirement is straightforward, such as combining five JPG receipts into one PDF, a free solution is often sufficient. For occasional users, this is efficient. For teams, it can reduce unnecessary software sprawl.

    What to evaluate before using a free online tool

    Not all converters are equal. Privacy should be the first checkpoint. If the JPG files contain IDs, contracts, medical information, financial records, or internal screenshots, the handling policy matters. Some services process files on remote servers and delete them after a short period. Others may be less explicit. Users should look for clear statements on retention, encryption, and deletion.

    Output control is another consideration. Basic tools may only convert in default settings, while better platforms allow page reordering, margin settings, orientation selection, page size adjustment, and compression control. These options affect whether the final PDF is usable for print, archive, or formal submission.

    File size behavior is the third factor. JPG images can be heavily compressed already, but combining many large images into one PDF can still produce a bulky file. A good converter balances image fidelity with reasonable PDF size. If a portal has strict upload limits, this becomes critical.

    Common limitations users should expect

    Free services often have boundaries, such as file count caps, maximum upload size, reduced speed during high traffic, or limitations on advanced editing features. That does not make them ineffective, but it does define the appropriate use case.

    Image handling can be inconsistent. Some converters preserve original dimensions well, while others aggressively scale or center images with wide margins. If visual accuracy matters, for example in design proofs or scanned records, test output quality before relying on a tool repeatedly.

    Ordering is another common issue. Multi-image PDF creation depends on correct sequence. If the upload interface is not explicit, pages may appear in alphabetical order, upload order, or an arbitrary drag-and-drop arrangement. That matters when converting documents with multiple pages.

    Online conversion versus desktop conversion

    The choice between online and desktop tools depends on context. Online conversion is ideal for speed, occasional use, and low-friction access. Desktop conversion is often better for sensitive documents, bulk processing, and advanced layout or OCR workflows.

    The trade-off can be summarized clearly:

    Criteria Online Free JPG to PDF Tools Desktop PDF Software
    Setup No installation required Installation required
    Speed for quick jobs Very fast Moderate
    Privacy control Depends on provider Usually higher
    Advanced features Often limited Usually extensive
    Cost Often free Frequently paid
    Best use case Occasional conversions Frequent or sensitive workflows

    For most users searching convert jpg to pdf online free, the immediate need is transactional rather than strategic. They want a reliable result now. That is where online tools perform best.

    How to Get Started with convert jpg to pdf online free

    A practical workflow that avoids common mistakes

    A clean result begins before upload. The source JPG files should be reviewed for orientation, clarity, and naming. If the images come from a phone camera, rotate them correctly first. If they represent multiple pages of a document, rename them in sequence so the intended order is obvious.

    Image quality also deserves attention. A blurry JPG does not become sharper inside a PDF. Conversion changes the container, not the source fidelity. If the original image is poorly lit, cropped badly, or captured at an angle, the output PDF will preserve those problems.

    A simple web UI mockup showing multiple JPG thumbnails being dragged into order, a prominent 'Convert' button, and a single PDF file icon with a download arrow. Include small labels: 'Upload', 'Reorder', 'Convert', 'Download'.

    For routine conversions, the workflow is usually simple. Upload the JPG files to a trusted online converter, arrange the images in the correct page order, adjust settings such as page size, margin, and orientation if available, convert and download the final PDF, and verify the output before sending or uploading it elsewhere.

    That last step matters more than users think. Open the PDF and inspect each page. Check readability, sequence, cropping, and file size. A 20-second review can prevent a failed submission or an embarrassing resend.

    Choosing the right settings for better output

    Page size affects readability and appearance. If the converter offers standard sizes like A4 or Letter, choose the one aligned with the destination context. Business and administrative use often expects one of those. If the images are photos rather than scanned pages, a fit-to-image layout may look better.

    Margins influence how polished the document feels. Zero-margin output can maximize image area, but modest spacing often improves readability and print behavior. For scanned paperwork, centered pages with consistent margins usually look more professional.

    Orientation should follow content, not convenience. Portrait is best for documents, forms, and notes. Landscape suits slides, dashboards, and wide screenshots. If the converter supports per-page orientation poorly, it may be worth rotating the JPGs before upload.

    Privacy and security considerations

    When using any service to convert jpg to pdf online free, assume the files are leaving the local device unless the tool explicitly states browser-only processing. That does not mean online conversion is unsafe, it means the user should apply judgment proportional to the data sensitivity.

    A public menu photo or generic presentation slide carries minimal risk. A passport scan, internal architecture diagram, legal agreement, or medical record is different. In those cases, a more controlled solution is appropriate. For teams, security is not only about encryption, it also includes retention policy, access logs, permission boundaries, and confidence in where files are processed.

    When free online tools are enough, and when they are not

    A free tool is enough when the use case is simple, low-risk, and occasional. A few receipts, a school assignment, a short image bundle for email, these are well within the strengths of browser-based converters.

    The threshold changes when the process becomes repetitive or business-critical. If a user converts dozens of image sets weekly, needs consistent page sizing, or must protect sensitive input, then the free tool model starts to show strain. At that point, efficiency is not just about zero cost, it is about minimizing rework and reducing uncertainty.

    Developers and technical users often evaluate tools through this lens. The question is not merely, “Can it convert?” The better question is, “Can it convert reliably, predictably, and with acceptable handling of sensitive data?” That distinction separates a convenient utility from a robust workflow component.

    Typical use cases across different audiences

    Students often need to turn photographed notes or assignment pages into a single PDF for submission systems. Freelancers convert JPGs into PDF for invoices, signed agreements, and portfolio pages. Support teams may bundle screenshots into one document for escalation records. Operations staff frequently combine scanned forms for archive or compliance workflows.

    Developers encounter this need as well, even if indirectly. Product documentation, bug reporting, UI review packs, and screenshot-based QA artifacts often benefit from PDF packaging. While the actual conversion may be non-technical, the underlying concern is familiar: reduce manual overhead and standardize output.

    That is why the search term convert jpg to pdf online free remains consistently relevant. It addresses a simple requirement, but one that sits at the intersection of usability, compatibility, and time efficiency.

    Conclusion

    To convert jpg to pdf online free is to solve a very practical format problem with minimal friction. JPG files are easy to create, but PDF files are easier to package, share, upload, and archive. Online tools make that transition fast, especially for low-volume and low-risk tasks.

    The best results come from using a trusted service, preparing source images carefully, checking page order, and reviewing the final PDF before distribution. For casual use, a free online converter is often all that is needed. For recurring or sensitive workflows, a more structured solution can provide a better long-term path.

    The next step is straightforward. Gather the JPG files, choose a reputable converter, test the output on a small batch, and confirm that the PDF meets your quality and privacy requirements. That single habit turns a quick fix into a reliable process.

  • New Manual Post: Create Clear, Actionable Operational Docs

    New Manual Post: Create Clear, Actionable Operational Docs

    Manual workflows break faster than most teams admit, and they do not usually fail in dramatic ways. They fail quietly, through missed handoffs, duplicated edits, inconsistent formatting, unclear ownership, and the constant drag of doing the same task from memory instead of from process. That is where a New Manual Post becomes useful, not as a vague note or one-off update, but as a structured manual entry that captures a repeatable action in a form people can actually use.

    A flow diagram showing a sequence of handoffs between team members where small issues accumulate: missed handoff, duplicated edits, inconsistent formatting, and unclear ownership. Visual cues like warning icons and faded arrows indicate quiet failures that slow the workflow.

    For developers and efficiency-focused operators, the phrase New Manual Post can sound deceptively simple. In practice, it represents a documented unit of work, a new procedural record, announcement, or instruction set created manually to support operational clarity. Whether it is being used inside a knowledge base, internal publishing workflow, CMS, team documentation system, or productivity platform, its value comes from precision. A well-constructed manual post reduces ambiguity, creates traceability, and makes execution less dependent on tribal knowledge.

    What is New Manual Post?

    A New Manual Post is best understood as a manually created content entry designed to communicate a task, update, process, instruction, or operational standard. Unlike automated posts generated from triggers, integrations, or templates alone, a manual post is authored intentionally. It exists because human judgment is required, either to add context, validate information, apply domain expertise, or document a process that automation cannot reliably infer.

    In technical and operational environments, this matters more than it may first appear. Automation is excellent at repetition, but weak at interpretation. Teams still need manually authored records for change notices, troubleshooting instructions, release checklists, environment-specific steps, incident summaries, publishing approvals, and process exceptions. A new manual post fills that gap by acting as a controlled artifact, something a person creates when accuracy and nuance are more important than speed alone.

    The phrase can apply across several systems. In a content management platform, it may refer to a manually published article or documentation entry. In a workflow environment, it may be a new procedural update entered by an administrator. In an internal productivity stack, it may function as a knowledge object that supports onboarding, maintenance, or cross-team coordination. The exact implementation differs, but the pattern is consistent: a human-authored post used to preserve operational intent.

    That distinction is especially relevant for developers. In engineering organizations, teams often over-index on tooling and under-invest in documentation primitives. A New Manual Post becomes a bridge between system behavior and human execution. It explains not just what happened, but what someone should do next. That is often the most valuable layer in any workflow.

    Key Aspects of New Manual Post

    Manual creation as a quality control layer

    Manual creation is not a weakness, it is a quality control mechanism. When a team creates a new manual post, it is choosing to insert judgment into the process. That judgment can validate assumptions, remove noise, clarify dependencies, and contextualize exceptions.

    This is particularly important in systems where automated output is technically correct but operationally incomplete. A deployment notification may state that a service changed, but a manual post can explain rollback conditions, affected users, validation steps, and support implications. That additional layer is what makes information usable rather than merely available.

    Manual posts also create accountability. A person, team, or role owns the content. That means changes can be reviewed, timestamps can be tracked, and revisions can be tied to actual decisions. For organizations trying to improve governance, compliance, or reproducibility, that ownership model is foundational.

    Structure determines usefulness

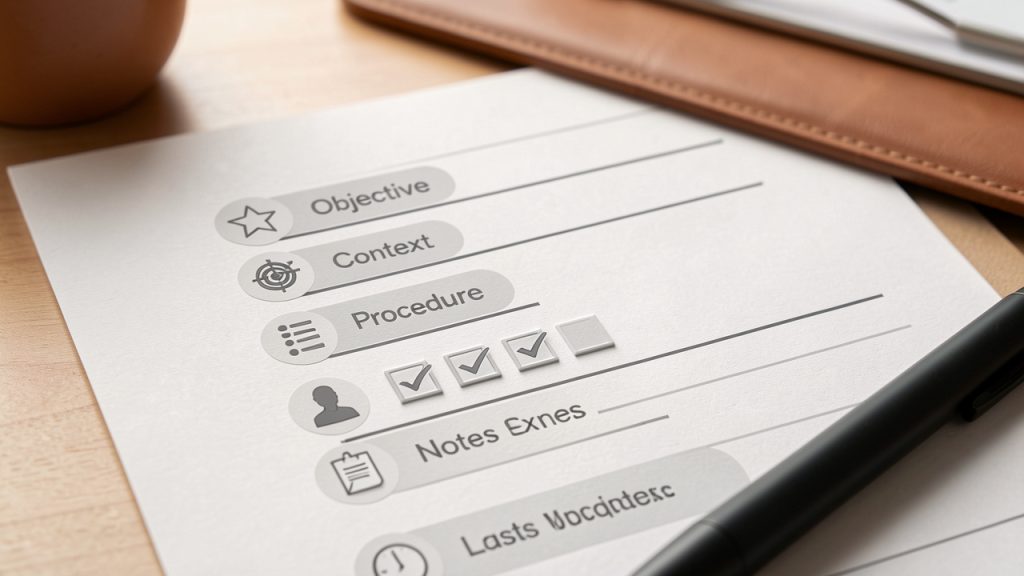
    A New Manual Post succeeds or fails based on structure. Unstructured notes age badly. They become hard to scan, hard to trust, and hard to maintain. A strong manual post typically includes a clear title, a defined purpose, contextual background, action steps, ownership information, and update history if the process changes over time.

    This is where many teams lose efficiency. They create “documentation” that is really just a text dump. Readers then spend more time interpreting the post than they would have spent asking a teammate directly. That defeats the point. A manual post should reduce cognitive load, not increase it.

    A practical mental model is to think of each post as an interface. Just as a clean API exposes expected inputs and outputs, a useful manual post exposes the exact information the reader needs to act. If the post is about publishing content, it should specify prerequisites, review criteria, publication steps, and failure conditions. If it is about system maintenance, it should make the order of operations obvious.

    Context is as important as instruction

    Many process documents fail because they focus only on the steps. Steps matter, but context determines whether a reader can apply them correctly. A New Manual Post should explain why the process exists, when it should be used, and what happens if it is skipped or modified.

    That context is what makes a manual post resilient. Without it, the content works only for the original author or for the moment in which it was written. With it, the post becomes transferable across teams and durable over time. Someone unfamiliar with the system can still understand intent, constraints, and expected outcomes.

    For developers, this is similar to writing maintainable code comments or architectural decision records. A line of code can tell someone what is happening. Good documentation explains why that choice exists. Manual posts should operate under the same principle.

    Searchability and retrieval define long-term value

    A manual post that cannot be found might as well not exist. The long-term utility of a New Manual Post depends on naming conventions, categorization, metadata, and discoverability. Teams often create documentation faster than they create information architecture, and the result is predictable chaos.

    A post title should be descriptive enough to stand alone in search results. The body should contain terminology that matches how users actually search. Related tags, timestamps, project labels, and ownership markers all improve retrieval. For efficiency-focused users, this is not administrative overhead. It is the difference between a living system and a digital graveyard.

    This is one place where platforms such as Home can become particularly useful. When a workspace centralizes manual posts with clean navigation, consistent templates, and strong retrieval patterns, teams spend less time hunting for process knowledge and more time executing it.

    Manual does not mean anti-automation

    A common mistake in workflow design is treating manual and automated processes as opposites. In mature systems, they are complementary. A New Manual Post should exist where automation cannot safely decide, where human review adds value, or where process exceptions need to be documented.

    In practice, the best systems automate the predictable layer and reserve manual posts for the interpretive layer. A monitoring system can open an alert automatically. A human can then create a new manual post that explains remediation logic, customer impact, and temporary workarounds. A CMS can generate publication tasks, while an editor creates the manual post that defines standards for review and approval.

    This hybrid approach is usually the most efficient. It respects the strengths of software, without pretending that every business process can be reduced to a trigger-action chain.

    How to Get Started with New Manual Post

    Begin with a clear operational use case

    The fastest way to create a useless manual post is to start writing before defining its purpose. A new manual post should solve a specific operational problem. That problem might be recurring confusion, missed execution steps, onboarding friction, publishing inconsistency, or dependency on one experienced team member who “just knows how it works.”

    Before writing, identify the exact behavior the post should support. Ask what the reader needs to accomplish after reading it. If the answer is vague, the post will be vague too. If the answer is concrete, the content can be engineered around that outcome.

    A strong starting point is to classify the post by function. Is it instructional, procedural, informational, corrective, or approval-oriented? That classification shapes the structure. An incident recovery post needs a different format than a content publishing checklist or a handoff guide.

    Define a repeatable template

    A New Manual Post becomes scalable only when it follows a standard format. Without a template, every author writes differently, and readers are forced to relearn the layout every time. Standardization reduces reading friction and makes updates easier to manage.

    A simple template can be enough if it is consistent.

    A clean, labeled template mockup of a New Manual Post page, with sections for Title, Objective, Context, Procedure, Owner, Notes/Exceptions, and Last Updated. Show an example short checklist in the Procedure area to illustrate actionable steps.

    Most teams benefit from a consistent structure that identifies purpose, prerequisites, the ordered procedure, owner, exceptions, and the last updated date. This kind of structure is especially effective for technical teams because it mirrors system design discipline. Inputs, outputs, dependencies, and control points are all easier to identify when the content model is stable.

    Write for execution, not for elegance

    A New Manual Post should be optimized for action. That means concise wording, explicit instructions, and minimal ambiguity. Many teams write process documents as if they are internal essays. That style tends to hide the actual work inside explanatory prose. The better approach is execution-first writing, where each paragraph moves the reader toward a decision or task.

    That does not mean removing detail. It means organizing detail so it supports usage. If a step has prerequisites, state them before the step. If a step can fail, mention the failure condition where it matters. If a process varies by environment, segment the instructions accordingly instead of burying the distinction in a later paragraph.

    Third-person, technical documentation style can be valuable. It encourages precision and discourages unnecessary flourish. For efficiency-minded readers, that style is respectful. It saves time and reduces interpretation risk.

    Test the post with a new reader

    The real quality test for a New Manual Post is not whether the author understands it, it is whether someone less familiar with the task can use it successfully. If possible, have a colleague, new team member, or adjacent stakeholder follow the post exactly as written. Observe where they hesitate, ask questions, or make assumptions.

    Those points of friction reveal missing context and weak phrasing. In technical environments, this is the documentation equivalent of usability testing. A process document that only works for experts is incomplete. It may still have value, but it is not yet operationally mature.

    Testing also exposes hidden dependencies. If the reader needs prior access, domain knowledge, or another internal document to complete the task, the post should make that explicit. Good manual posts surface those assumptions instead of silently relying on them.

    Maintain it as a living asset

    A manual post should not be treated as a static artifact. Processes evolve, tools change, permissions shift, and exceptions become normal behavior over time. If the post is not reviewed periodically, it will drift away from reality and eventually become a source of error rather than efficiency.

    This is why ownership matters. Every New Manual Post should have a maintainer, even if updates are infrequent. A post without an owner usually becomes stale. A post with an owner has a better chance of remaining useful because someone is responsible for validating it against current operations.

    Teams that manage documentation well often integrate manual post maintenance into existing review cycles. Release updates, quarterly audits, onboarding reviews, and incident retrospectives all create natural opportunities to refresh relevant posts. In a centralized environment such as Home, this process becomes easier because documents, owners, and usage patterns can be tracked in one place.

    Focus on the first few high-friction workflows

    Teams often overcomplicate adoption by trying to document everything at once. A better method is to start with the processes that produce the most waste, confusion, or rework. Those are the workflows where a New Manual Post will deliver visible value quickly.

    Start by identifying the recurring task that causes the most avoidable questions or errors, document the current best-known process in a structured manual post, validate the post with one or two real users performing the task, and refine the content based on confusion points, omissions, and edge cases.

    That approach turns documentation into an operational improvement loop instead of a one-time writing project. It also helps build organizational trust. When people see that manual posts solve actual problems, adoption becomes easier.

    Conclusion

    A New Manual Post is not just another content entry, it is a practical mechanism for turning fragmented know-how into usable process knowledge. When created with structure, context, and ownership, it improves consistency, speeds onboarding, reduces preventable mistakes, and gives teams a clearer path from information to action.

    The next step is straightforward: choose one workflow that currently depends too much on memory or messaging, and create a single well-structured manual post around it. If the post is easy to find, easy to follow, and easy to maintain, it will do more than document work, it will make the work itself more reliable.